
Naturally I am assuming that you are setting up WordPress on an independent Hosting package. This step by step guide is based on the steps I take personally to set up my domains and start building the structure and foundation of my Websites. These first few steps provide the first pieces of the WordPress Jigsaw.
- Step 1 The Domain Name
 Although this may sound quite obvious the first step would be to confirm that the domain name you want to use for your website is available to buy. Remember the Domain you use is important and you must think about the overall content of your website. Were possible the domain name should be short and memorable, not to mention relevant to the brand/corporate image or topic of your website content. You must also consider which extension will it be, .co.uk or .com extension?
The cost of domains will vary and sometimes depends on the period they are registered for, you can register a domain from 1 to 5 years in many cases. Personally I register most of my domains separate from my Hosting accounts. One of the reasons I do this is to qualify for a 40% discount on all renewals for my domains and those I register for clients. Keeping them separate also means that I have the flexibility to change the DNS (see step 3). As a point of reference you may find great deals on domains, however please be aware that if this is a Domain Name you plan to hang on to, the renewals may not come so cheap in the long run. (Swings and roundabouts).
- Step 2 Setting up a Hosting Account
 In the Getting Started section we have already discussed the importance of good hosting and the basic requirements you need. Setting up a Hosting Account with a provider like HostGator offers a range of packages my personal choice is the Business Package, as this gives me everything I need to manage my Hosting account, plus the support is also very good. The payment plans are also quite flexible and you can choose to pay monthly, half yearly or annually, whatever suits your budget. Stetting up an account with Hostgator is quite straight forward. Although I choose to register my domains separately it’s entirely up to you, you can register your domain with them if you wish, that way you can skip the next step as you wont need to change the DNS.
 - Step 3 Changing the Named Servers
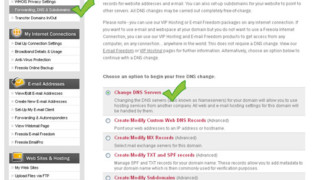
 Changing the DNS is quite a simple process, most Hosting providers give clear step by step instructions on how to do this. The example below illustrates how it is carried out using a Freeola/Getdotted account and moving a domain to Hostgator.
This Screenshot shows where you change the DNS when logged into the MyFreeola Control Panel
Changing the DNS is quite a simple process, most Hosting providers give clear step by step instructions on how to do this. The example below illustrates how it is carried out using a Freeola/Getdotted account and moving a domain to Hostgator.
This Screenshot shows where you change the DNS when logged into the MyFreeola Control Panel
The Named Servers are always based on two numbers, Primary and Secondary, these go in the boxes illustrated in the Screenshot opposite.Please make sure you enter these correctly, if you put the wrong numbers in here your website will not be found.
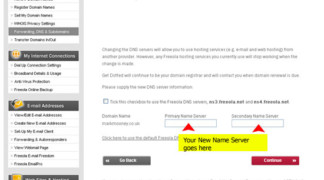
The Named Servers are found on the Cpanel of you Hosting account, the Screenshot opposite illustrates where the account details are found at the foot of the main Cpanel when using Hostgator.

Propagation? When changing the DNS you may see references to “Propagation” basically this is the time it takes servers to register the change in the DNS. It can often take 24 to 48hs for this to take place.
- Step 4 Activating WordPress
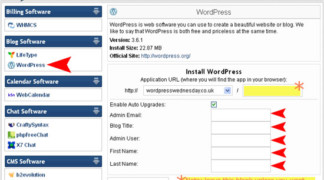
 Once you have changed the DNS or secured your Hosting account with Hostgator setting up the WordPress platform is quite a simple process especially when using the QUICKINSTALL Feature in the Cpanel, as illustrated below.
When you login to your Cpanel you will see the logo for QuickInstall, listed under Software/Services, simply click this icon to open the feature illustrated. You can also use Fantastico, however Quick install will add the latest version of WordPress and it’s believed to be more reliable than Fantastico.
Once you have changed the DNS or secured your Hosting account with Hostgator setting up the WordPress platform is quite a simple process especially when using the QUICKINSTALL Feature in the Cpanel, as illustrated below.
When you login to your Cpanel you will see the logo for QuickInstall, listed under Software/Services, simply click this icon to open the feature illustrated. You can also use Fantastico, however Quick install will add the latest version of WordPress and it’s believed to be more reliable than Fantastico.

When QuickInstall loads simply click on the WordPress link on the left, complete all the fields marked, click the install button and that’s all there is to it. Please note if you want to add WordPress to a sub-folder simply enter the name you wish to use in the field I have marked in yellow. When you enter the email address ensure you use one that is currently live, sounds obvious but many people add an email address they don’t yet have live. The reason I mention this is because the login details will be emailed to you, it’s surprising how many people forget their login details within just a few hours of setting up WordPress.
Once you have done this Quick Install you can simply go to www.yourdomain/wp-admin log in to your Dashboard and start exploring WordPress.